
After being a hands-on leader and a part of different teams of varying sizes, from fast-paced start-ups to large-scale companies, I have seen many product development attempts succeed and fail. This has helped me see the best and worst of other processes I have been exposed to. There is no 'one-size fits all' strategy regarding product and interaction design. Every team, company, problem, and culture is different. It needs to have a slightly different approach when realizing a solution, but the Jobs-to-be-Done framework and Design Thinking are the most Fluid in their approach to helping get the best outcome needed.
Design Thinking
The design thinking methodology for interaction design is the backbone of my work. It is open-ended and fluid enough to allow for finding the correct Problems to Solve (PTS) rather than finding an immediate solution. It works well in an agile environment, but it also can work in a hybrid environment, like LEGO. At LEGO, we dealt with Digital and Physical products. Traditionally the physical side of LEGO ran in the Waterfall methodology. This meant that running a pure agile approach took a lot of work for the interaction designers working closely with model designers. Design Thinking was able to bridge the gap and allow us to quickly ideate and iterate on ideas with model development while prototyping to come up with the best products for the markets, but Waterfall set the deadline.
Jobs to Be Done
The Jobs to Be Done framework aims to understand customer behavior better. While conventional product development focuses on market demographics or product attributes, the Jobs to be Done Theory goes beyond superficial categories to expose the functional, social, and emotional dimensions that explain why customers make their choices. People don’t simply buy products or services; they pull them into their lives to make progress. We call this progress the “job” they are trying to get done, and understanding this opens a world of innovation possibilities. I believe that using this framework as a way in early product development and to look at your work honestly can help you make better choices to meet the needs of your consumers.
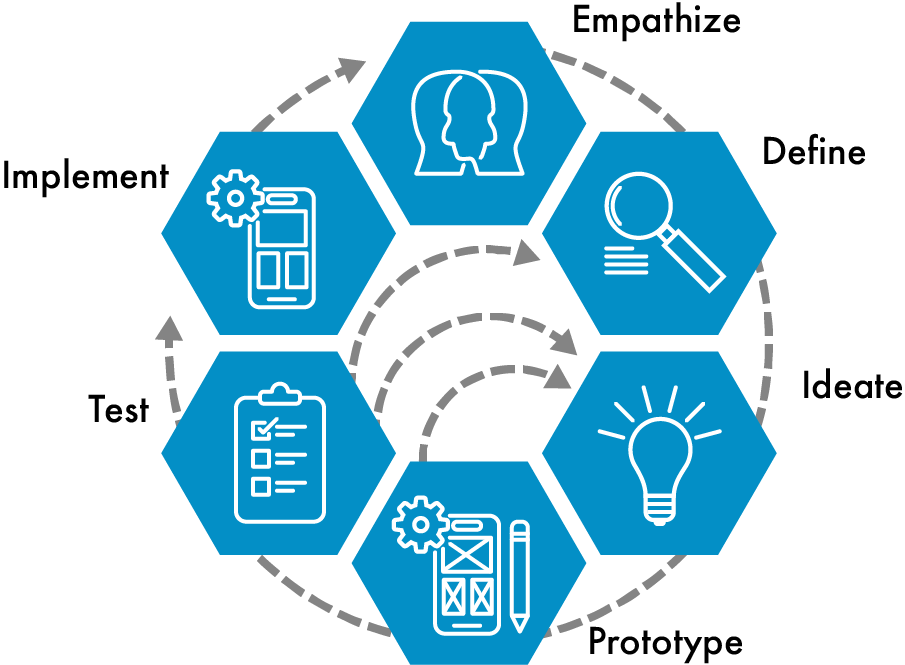
My Process
1. Empathize—Identify Jobs Consumer Needs to Get Done
With the fluid nature of my design process, one of the keys to success comes from being able to make sure that you are continuously checking in and understanding your consumer's needs and what you are building to get a job done that is going to have a positive impact on them. You must openly and honestly define how a specific job will be better for your product to succeed. Being able to empathize with the consumer and understanding what jobs they are looking for to get done help you understand lots of requirements and problems that need solving.
2. Define the Jobs and Define Problems to Solve (PTSs)
Once you understand the Main Jobs and Related Jobs your customer wants to achieve, there are requirements for these jobs that help you understand the customer even more as a designer. The Functional aspects, Emotional aspects, Personal dimensions, and Social dimensions. Connecting these dots allows you to better empathize with your consumer and make a better product.
Coming out of definition, another aspect can often be overlooked in the practical world. What problem to solve (PTS) do we have to get this job done? A PTS should not require a whole new design process, but it should help guide the process or set workstreams in motion for finding solutions to help make the product what it needs. Defining the PTSs as often as they come up can make it straightforward for the extended team to see what it looks like for the overall product, not just the design cycle.
Research & Competitor Analysis
A big part of defining jobs is researching what products are hired to solve similar jobs. Does any product currently on the market have something similar to what we have been tasked to design and build? Is it common? Is it successful? Which product is the best? And why? What alternative options will result in a more intuitive and successful result?
3. Ideate
During ideation, I like to start with getting the roadblocks out of the way. I find it helpful to do a quick brain dump of anything at the top of people's minds; usually, the hurdles are the first thing to come out. If you can capture those PTSs, then you can continue generating ideas. To be active in a brainstorming session, I like to break up the session with creativity and specific concept generation rounds. All of these are then funneled into Job Statements.
1. Define know PTSs? Defining these clears the road for continued ideation of development.
2. Define Concepts?
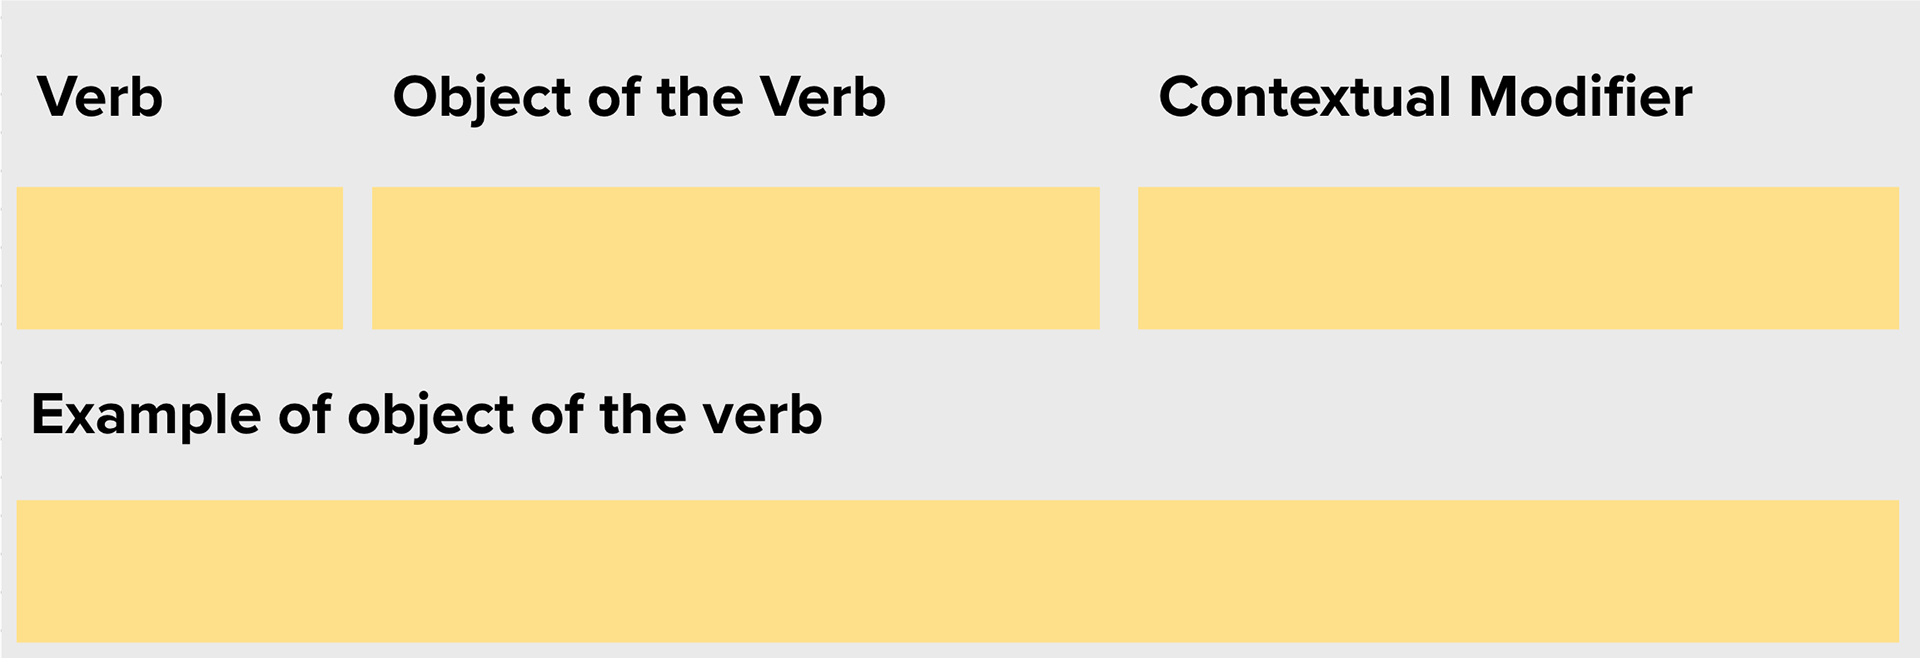
3. Create Job Statements? (Action + object + context)
4. Prioritize JTBD Opportunities?
4. Design & Prototype
The design has many stages, but it is important to note that the design phase is iterative and often takes many iterations to get to the final product. Depending on the nature of the team and who needs to buy in will depend on where I start in the design phase.
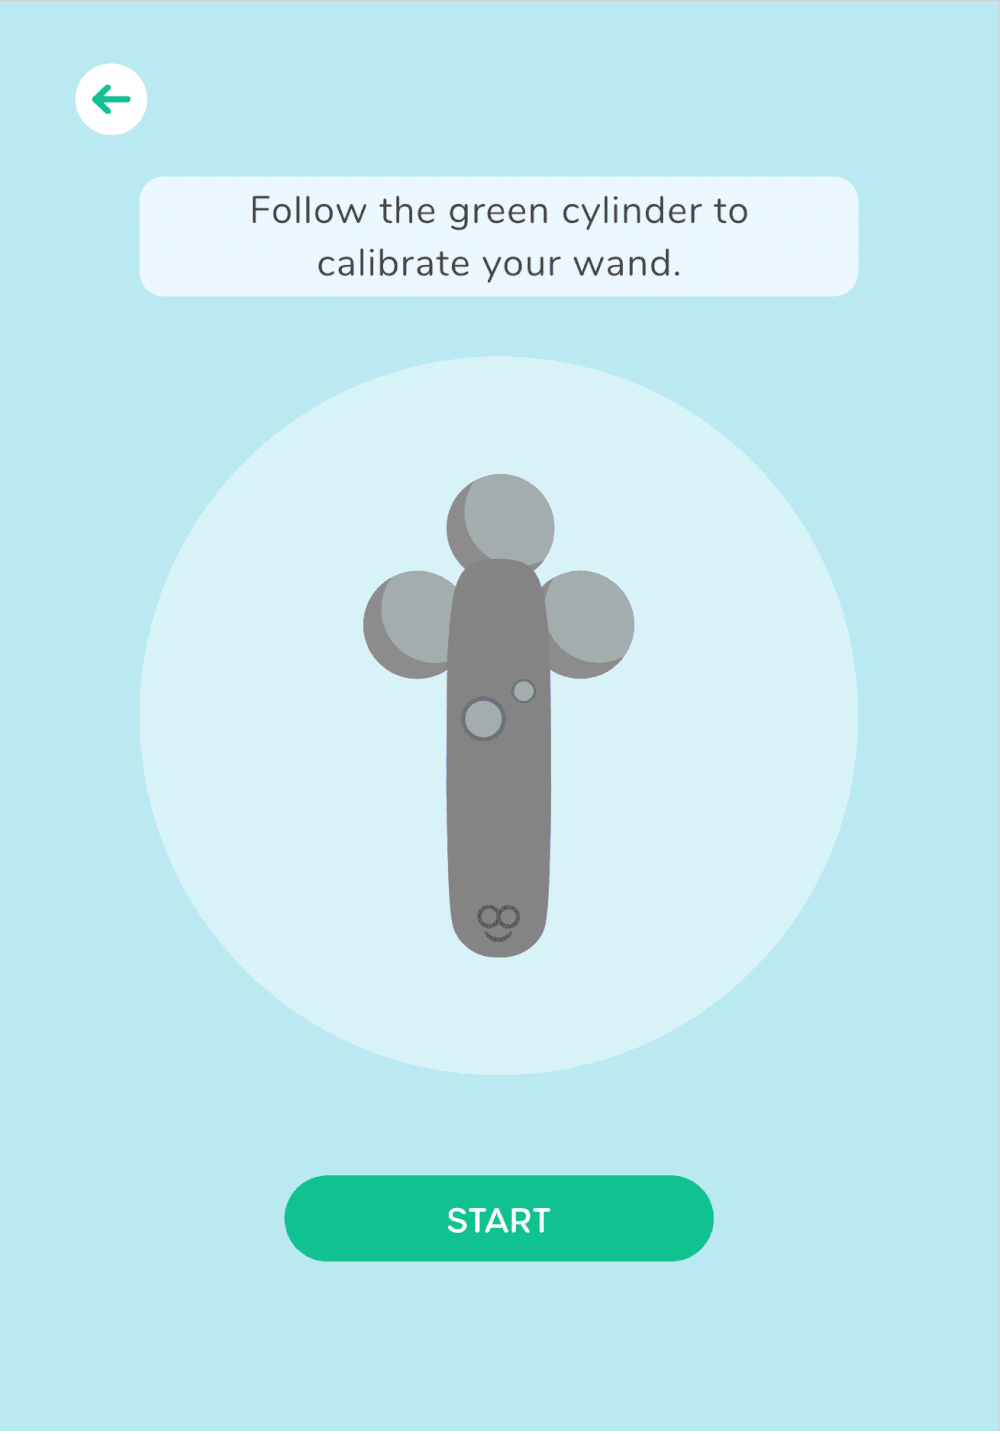
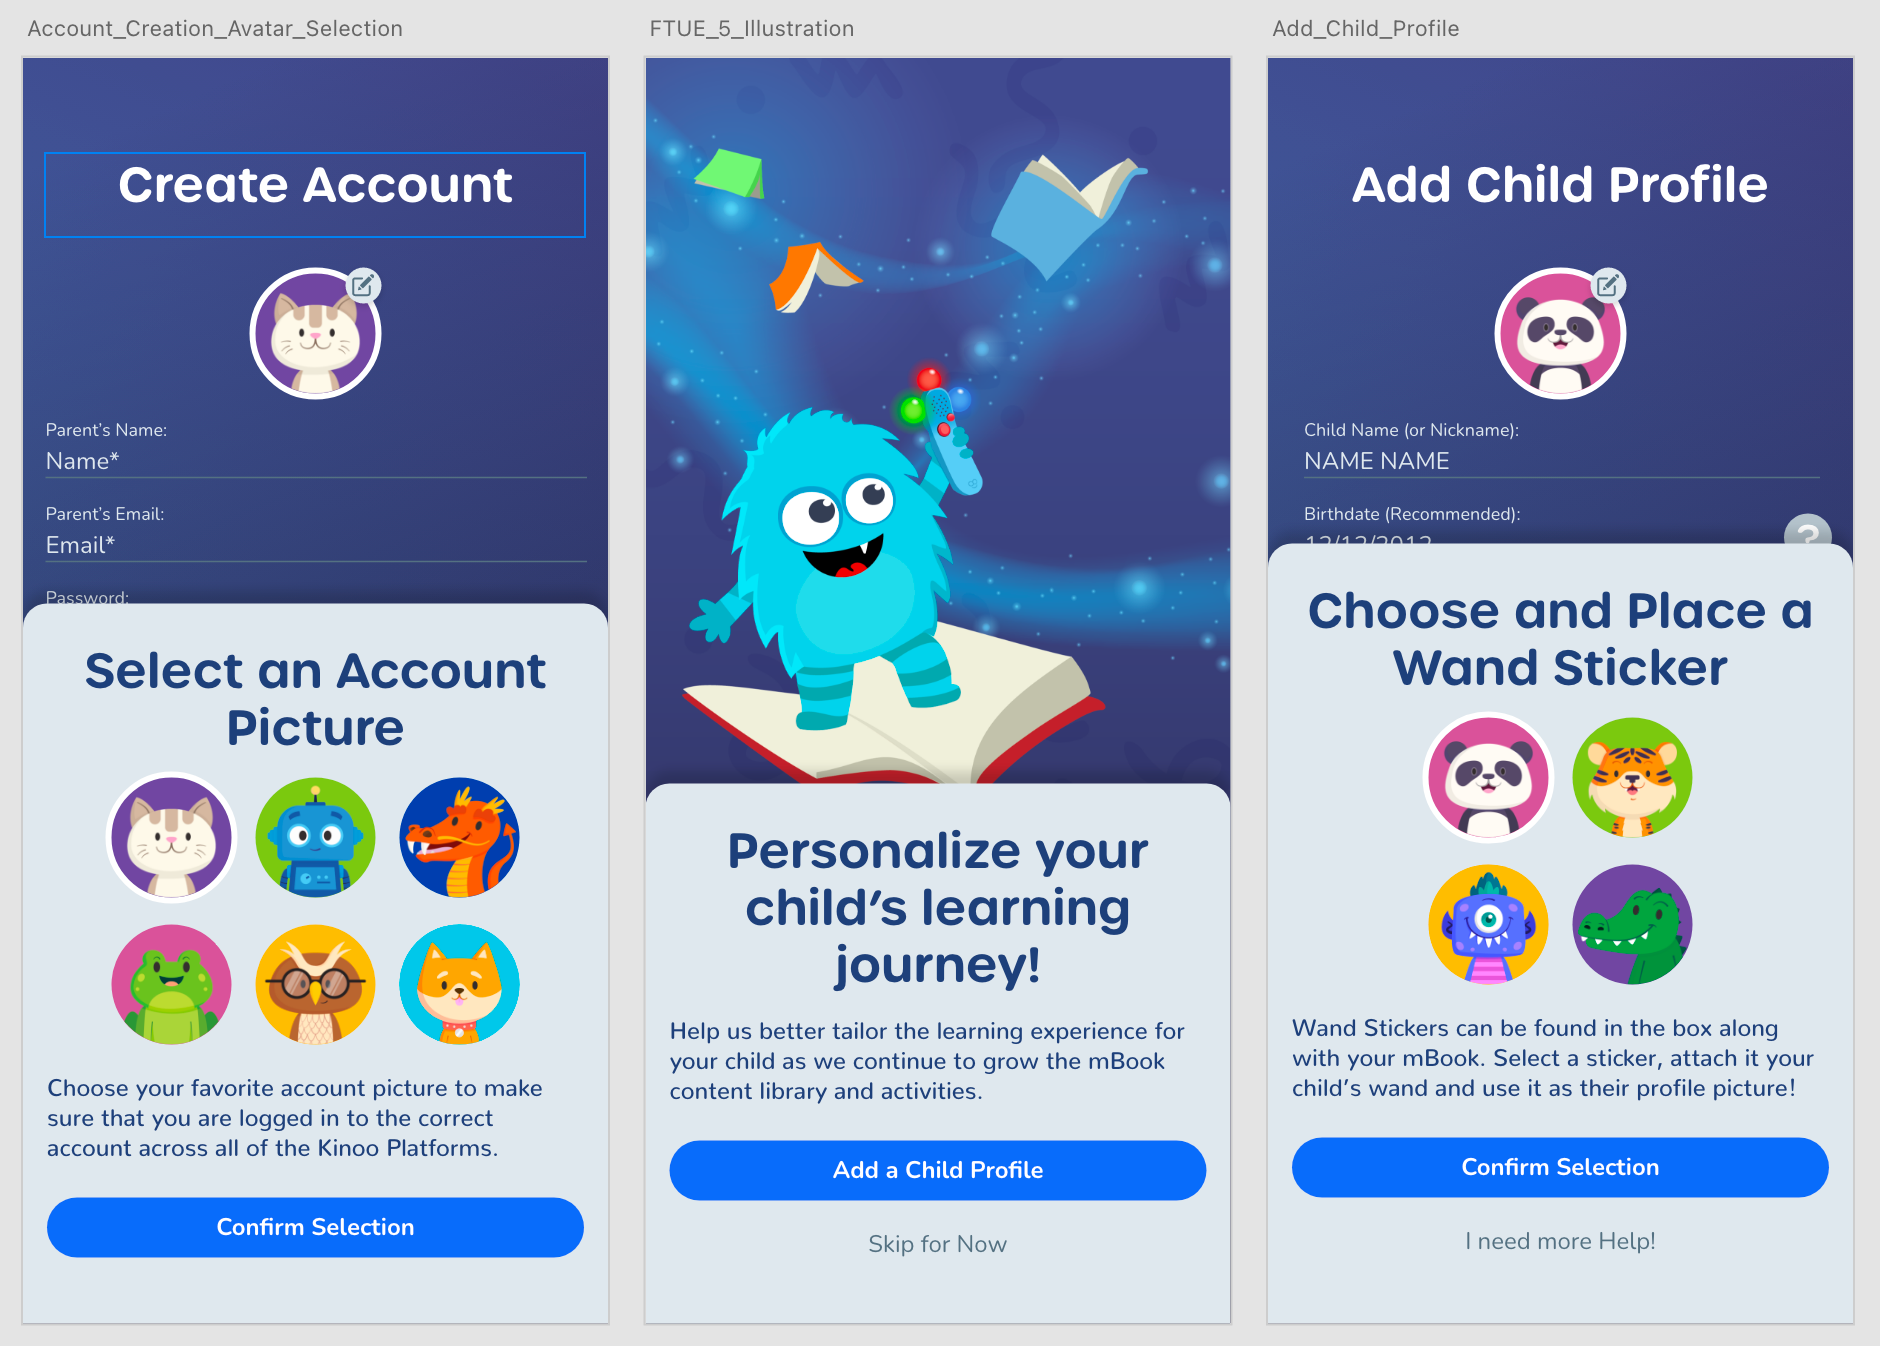
1. Defining logic: Visual representation of what is happening within the app. Logic is constructive when introducing, discussing, and planning the project with developers. Understanding the Logic answers many questions; let’s consider adding a new feature, for example: How does this feature fit into the product? What is impacted by adding this feature? What influences the feature? Are any additional functionalities needed? What are the possible edge cases? How does this affect the timeline for development?
2. Wireframes: The next step is determining the information needed, layout, and content placement on the screen. Wireframes highlight navigation, functionalities, potential problems, and edge cases. Collaborating with the development team, wireframes are shared so they can loosely plan the build and give the go-ahead to continue on this path for design. Can the design be built with current resources within the needed timeframe?
3. Prototypes: After gathering feedback on wireframes and identifying the go-ahead layout for navigation and functionalities, the next step is to prototype with the first stab at UI design. This stage is essential in exposing possible design issues, estimating design and development time, and helping with user testing.
4. Final Mockup: This is the last step in the initial design phase. Finalizing the designs using data from user testing, internal testing, and other product requirements that may have been recently requested. Present and hand off final designs to the development teams to build.
5. Test
Once we have something that can be tested, in whatever state it is, Paper Prototype, Sketch, Wireframe, Prototype, etc., we can put these in front of the consumer to get initial feedback to begin to iterate on. There are a lot of discussions in the UX community about how much time to spend on visuals before testing. Still, as I have worked in the children's space for so many years, I have found there is a balance between how much time you spend on the look of a prototype before it gets tested. UX and UI are considerably connected, and a good UI can impact how the user perceives the UX.
Testing is crucial, and learning from your test is even more critical. Learning from testing should be taken back into further iterations of design as often as possible.
6. Implement and Iterate
Evaluating the implemented designs against defined specifications often differ slightly from project to project. I look at a colleague, QA, and personal evaluations, as well as user testing, to determine if the design has solved the Job to be Done effectively. Feedback from each of these testing groups is essential to document and consider for the project's subsequent iterations or phases. Evaluation can result in the initiation of new design solutions. It is important to note that evaluation does not only happen at the end but is also ongoing and does not stop until a final design has been reached. The product has been released and often is iterated on after live data is collected.